


Today, in this post I will be talking about How to Make Your WordPress Blog Push Notification Ready using the service called PushEngage: A web-push notification service for WordPress. It also supports other platforms like e-commerce sites, BlogSpot, Joomla, Drupal, bbPress & much more.
Table of Contents
What is Push Notification?
If you are using a SmartPhone (Android or iOS), then I’m sure you are aware of the Push Notifications sent by the apps that you had already installed on your SmartPhones. Web-Push notifications are also similar to smartphone push notifications where your Web-Push subscribers will be notified when a new post is published or when you manually send a push notification.
Using the service called PushEngage, you give another subscription option to the readers of your blog. PushEngage is an awesome service that allows you to send these push notifications.
PushEngage works on Chrome(all platforms), Firefox(all platforms) and Safari(on mac).
In this article, I will show you how to enable push notification for WordPress blog in an easy way.
Setting up Blog Push Notification
The setup part is quick and easy. So let’s get started with this step-by-step guide.
First, go ahead and create an account on PushEngage over here. Fill up all the required details like Website, E-mail, Sub-Domain, and Password. Then click on the Signup button.
The free account allows you to send unlimited push messages per month for 2,500 subscribers, which is a decent number for a small and medium-sized blog.
Once you have signed up for an account, you will be redirected to the Welcome page where you need to add your blog’s name and add your blog’s logo. This is useful for the branding of your push notifications.
If you are not automatically redirected to the Installation page then,
- Go to Settings > Installation Settings & add your logo. (This is important for your brand identity.) See the Screenshot below


Subscription Dialog Box Settings
- Go to Settings > Subscription Dialogbox Settings
This is the page where you will need to configure the prompt style that users will see to subscribe to your push notifications. Select your Site Type (http or https) and then the Dialogbox Type Well, I use “Single Step Optin” & I would suggest the same for you. “Safari Style Box” is also the popular one.


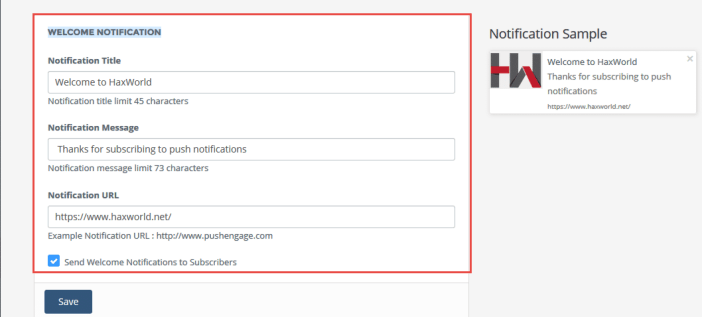
Set up Welcome Notification(optional*)
- Go to Settings > Welcome Notification Settings (this step is optional).
You can use this feature if you want to send a welcome message to users who subscribed to your notifications.

*this step is optional.
Now, it’s time to install & set-up WordPress plugin. Open up your WordPress admin dashboard, then:
- Go to Plugins > Add New and then search for a plugin called “PushEngage”. Install and activate the plugin. (Link to the plugin)
- After successfully activating the plugin, go to your PushEngage panel and now you need an API key in order to activate the WordPress Plugin. Inside your PushEngage panel, click on the Get API key under the Settings tab. I already marked the points below in the image.


After successfully generating the API key, go back to your WordPress admin dashboard and then:
- Go to PushEngage > Dashboard
- Now paste your API key that you generated in the PushEngage panel. And then click on Submit.


In your post writing section, you will see an option to send push notifications even when you update a post.


Register for PushEngage(click here)
Do let me know your experience with web-push notifications. Still any doubt? Ask in the comment section below.